Last year, in fifth grade, I piloted the TEER strategy for answering short answer questions in response to literature. TEER is an acronym to help students remember the four parts their answer needs to have. Those parts are:
TTQA (Turn the question around)
Evidence (right from the book, including page number and quotation marks if not paraphrasing)
Explanation (Why did you choose this as the most compelling evidence?)
Restatement
With students a year younger in fourth grade, I found they needed a lot more structure. Specifically they needed the actual words to use to signal both the evidence section and the explanation sections. So I created a scaffolded form that helps students with language impairments create fantastic open response answers. The words the students need are right next to the appropriate section, so students can easily access them. Why didn't I have them pre-printed so all they had to do is fill in the blank? My mother, a sped Teacher of the Year, always taught me:
"Have students write what you want them to most remember."
There certainly is a time and place for creativity in open response. But when students are first learning the "nuts and bolts" of this specialized type of writing, they should not be creative. Once they have learned the structure of open response, they can apply their own brand of creativity.
Many teachers have asked if guided reading still has a place with the Common Core State Standards. Guided reading is an instructional technique in which teachers load much of their instruction up front. They often preview challenging words to decode and vocabulary words that may be unfamiliar. Often teachers also give students background about a topic covered by the text that may be unfamiliar to the age and background of our students.
The Common Core State Standards (CCSS) in general de-emphasizes pre-reading strategies in favor of students digging deeply into texts and figuring out challenging words and ideas by "wrestling" with the text itself. This instructional technique is called close reading.
So, back to my original question. Does traditional guided reading still have a place in our classrooms today? It is my belief that overusing a guided reading approach does not encourage students to use any strategies when they are reading for pleasure or during an assessment. However, there is still a need in our classrooms to use some guided reading techniques.
This year I have a small group of students that really struggle with comprehension and fluency. They don't like reading and are not able to find or stick with good fit books. Their Daily 5 reading is totally deviod of thinking or strategizing. Despite my repeated attempts and teaching, they view reading as a passive process, often called "word calling" in the research on literacy instruction. We're now in the second quarter. This just can't continue. So... time to dust off guided reading, which is towards the bottom of my "bag o' tricks".
In my version of guided reading, I will still preview a few individual words, but I will also heavily use context clues to help the students discover for themselves what the words mean. Then students will read the text once through, looking for the "main idea". I am using a biography of Vasco da Gama which links in to our Social Studies unit on Explorers. This picture book has some pretty hefty vocabulary. The first time the students read the books, the task they will have to accomplish is to figure out where would be a good place to end the chapter, if the book was a chapter book. Then they have to give the title a chapter and justify their choice. They'll be marking the book with post-its, so if they need to revise their ideas they can.
All Things upper Elementary, a blog that I follow regularly recently had a post about teaching students to really develop problem-solving skills, rather than just learn rote algorithms. See her fantastic post here. This post really resonated with me as we are in the final days of our unit on subtraction. Most of the kids can use the algorithm successfully to subtract multi-digit numbers. Some cannot. But even those that can use the algorithm don't really understand what they are doing. To quote the ATUE:
"A written algorithm is meant to SHOW you have to think, NOT teach you how to think."
I realized that I needed to teach more thinking and less algorithm. So today's freebie lesson plan is designed to focus students on using rounding and estimation to help them with subtraction.
Materials: personal whiteboards, marker, and eraser for each child, the same for the teacher.
Duration: About 30 minutes (can be made longer or shorter) Grade Level: 3-5
1. Warm-Up: Pose some subtraction problems using multiples of ten. Start with problems like 90-70 = ? and end with problems like 8,000 - 5,000.
2. Write your final problem in the warm up on the board (let's say it's 8,000 - 5,000). Pose a related problem, leaving the first number the same, such as 8,000 - 4,875. Have the students estimate a solution and show their answer. If more than a few students get the answer wrong (it should still be 5,000), demonstrate how 4,875 rounds up to 5,000. So the answer will be about the same as the original problem. You can't just use the front of the number to estimate the answer. You need to look at the whole number.
Do several more examples, coaching after each one as needed. Once most of the class can successfully estimate the difference for each problem you pose, ask them to not end their estimates in zero. Pose problems in a sequence like this:
Ask students to tell how they decided if the difference was more or less than their estimate. If students do not come up with a method, show them how when the subtrahend is less than the estimate, the difference will be larger. Pose several problems using this method.
By using a lesson progression like this, you can help students think beyond the algorithm. Enjoy!
As teachers in the US are returning to school, many are beginning to moan and groan about the overwhelming tide of testing that has engulfed the US educational system. Assessments seem incapable of surviving alone. Within a year, they reproduce like rabbits. Because, of course, you need a test to see if your kids are ready for the BIG TEST. And if one of those tests a year is good, then one per term is even better for progress monitoring. And that test doesn't test everything, so you need to sprinkle in a few others for good measure. Then, of course, the next grade level wants a different assessment from the ones you use, so... You get the idea.
Like it or not, I don't think this frequency of assessment is going away any time soon. It is too convenient a measuring stick for districts, principals, and teachers. And that, my friends is the real wave of the future. In some states, the bottom performing 10% of the teachers in a school must be fired. In my school, assessment data is used to create yearly goals that count as a percentage of our annual performance review. Right now that percentage is small. But it is bound to rise in the coming years.
So, when life gives you lemons, make lemonade! That's right! When your students are required to take yet another test, make it worth it... for both them and you.
Making tests worthwhile to you:
1. Learn as much as you can from the assessment data. If you don't know how to read the assessment data (few of us learned to do this in college), ask your school "data guru". Every school has at least one.
2. Use what you know about your students and how you taught them to interpret the results. Many people rely on others to "read" their data for them, but even the wisest data guru is limited because they don't know your kids and how you taught them. Leave the data gurus to look at the big picture- trends across the grade and grade levels. Only you know whether a weakness the test reveals is because you haven't taught it yet or you did teach it, but your students didn't master it. For example, last year my principal remarked that my Math class was the weakest in the grade level on data, statistics, and probability. Since I had already looked at my own data, I agreed. Then I showed her the results for my class at the beginning of the year. Every child's weakest area was number sense and operations. Since number sense and operations are the foundation of Math, I decided to focus my teaching in this area throughout the year. Yes, because of this focus, something had to give. But, by the end of the year, not a single child had number sense and operations as their lowest area. And the class overall had the third highest level of overall growth in test scores.
3. Know your test data well. Like it or not, your tests scores will be used to assess your teaching ability and compare you to others. Suck it up and be proactive. Be honest about what your data says. Even it's not complemenary, be prepared to say how you will use the data. And find the nugget of wonderfulness in your data, even if it is just one child.
3. Use your assessment data and, when you do, tell your students that you are doing it. Something along the lines of: "Your recent ______________ test showed that ______________. So today we are going to _________ ."
Making test worthwhile to them:
1. Given them information about how they performed last time on the same assessment and what their goal is for this one. A bit of specific advice never hurts.
2. Give students feedback on their performance as soon as possible. Next generation assessments can do this immediately, but don't just be content with a score. Again, here is where your interpretation will be vital. Put it in kid-friendly language. Try to come up with at least one positive comment, such as how hard they worked or how long their written answers were.
I assure you that when you follow these words of advice, your students will do their best on the test. They will become hungry for your feedback.
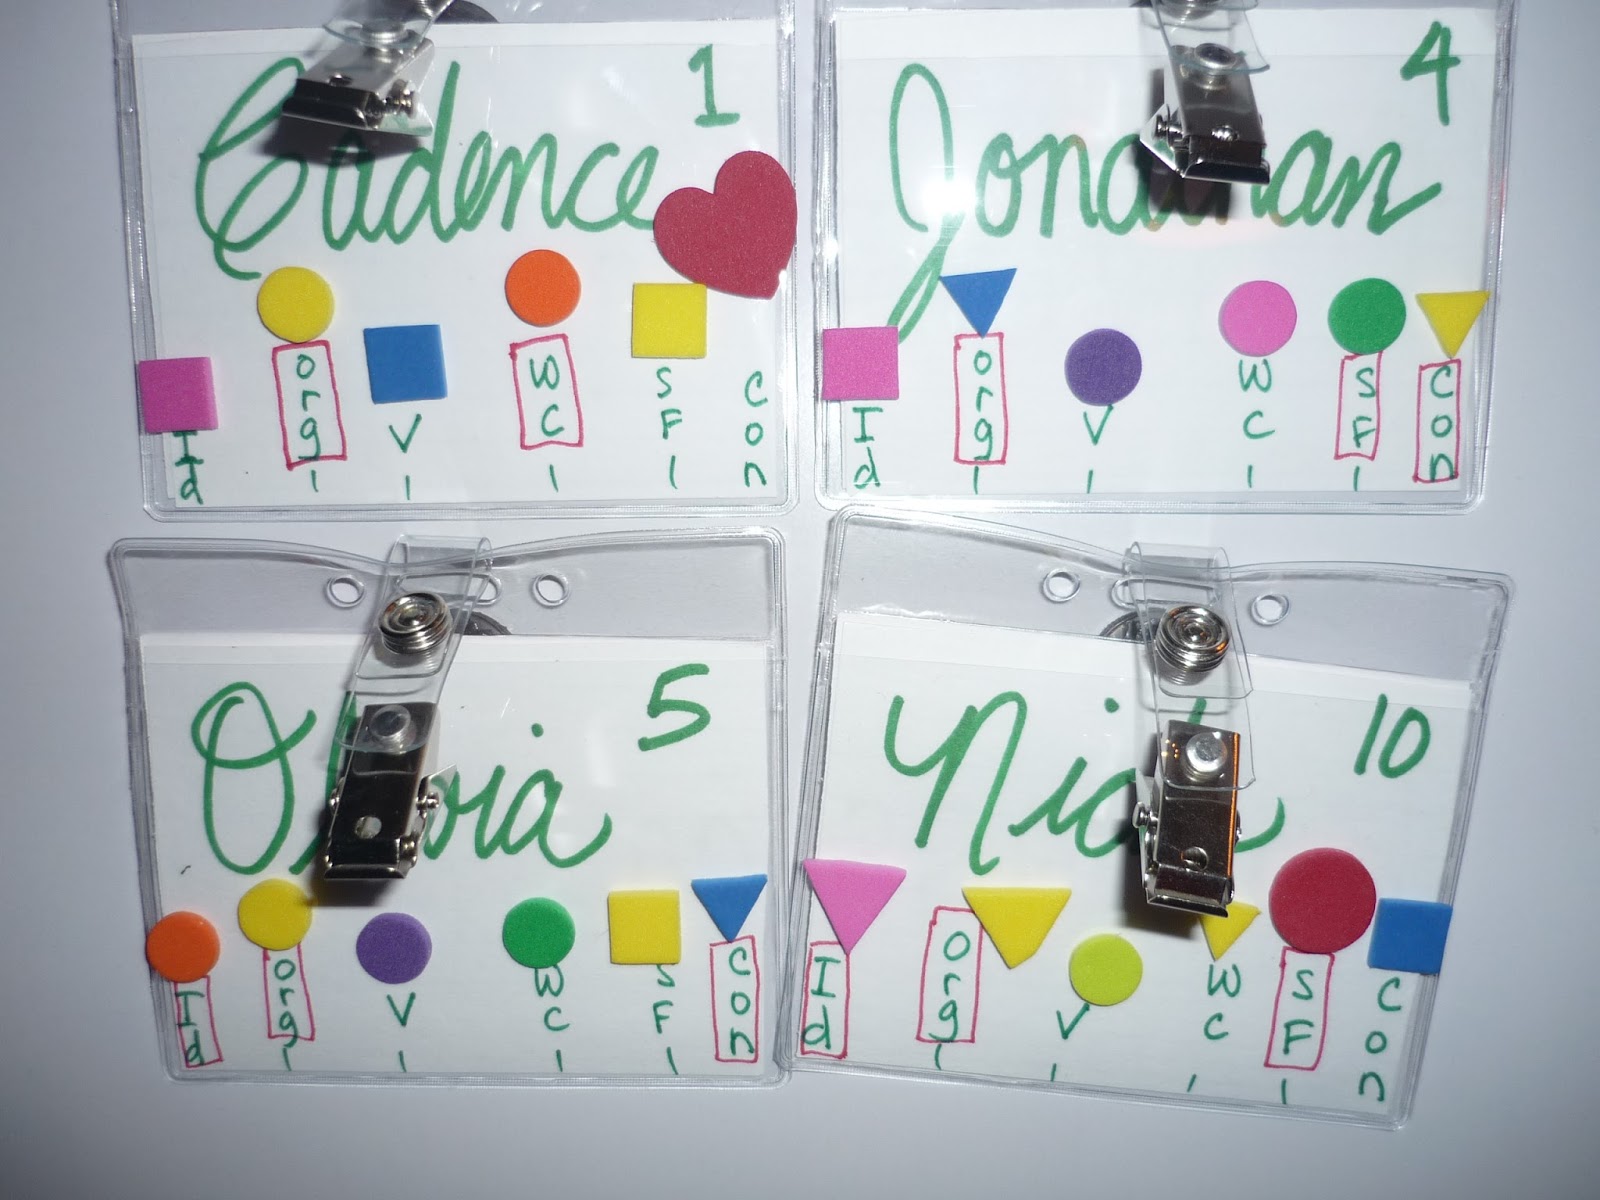
This summer one of my professional reading books was Word Nerds by Overturf, Montgomery, and Holmes-Smith. In the book they suggested the use of inexpensive badge holders to assign each student a vocabulary word to practice activities throughout the day. As I purchased the badge holders, I got to thinking how I could make this tool work in other areas. Here's my plans for next year:
1. Attendance and Lunch Count
I glued a magnet to the back of the holder. Students will move their badge from the absent section to their lunch choice each day as an easy way to take attendance and take lunch count.
2. Peer Editing Based on Writing Goals and Levels of Proficiency
Writing is right after recess in my classroom. When they come in, they will take their badge holder off the attendance board and clip it on with their name showing. Below their name, each child has the Six Traits of writing. Their personal goals are boxed in red. Nick's goals are in Ideas, Organization, and Sentence Fluency. Their present level of proficiency is represented by a shape: triangle for level 1, circle for level 2, square for level 3, and heart for level 4. Seeing these shapes will give students daily reminders of their goal areas. If students move up a proficiency level during the year, I will change the foam sticker.
In my classroom, students can only be a peer editor in an area where they are at a higher profiency level than the peer they are editing with. So, for example, Nick has a level 2 in Sentence Fluency. He can be a peer editor for a student with level 1 in Sentence Fluency. The badge will let all students know where they stand visually.
But, you might say, Nick has a goal to improve in that area. All the better. As Nick helps other students, he will become stronger and practice that skill. As teachers, we all know how much we learn when we have to teach others.
Below is the start of a poster that explains the four levels. This will go on my "Writer's Block" bulletin board and goes with my classroom colors of chalkboard green, black, and ladybug red.
3. Vocabulary Practice
Right after Writing is ELA, which consists of English grammar, spelling, and vocabulary. Students will turn their names around to become vocabulary words for this instruction. In the picture you can see the magnets I attached to the back for attendance. I think I will make a nice and quick, but meaningful, transition from Writing to ELA, which occurs back-to-back in the same literacy block.
Students will use the vocabulary words in many hands-on and creative ways. They can line up by definition, in alphabetical order, group themselves by parts of speech, roots, or affixes. Throughout the week, students will be adding synonyms and antonyms to the 5 core words for the week. Students can pair with their synonym or antonym and decide which is "stronger" and why. They can us the vocabulary cards for charades and creating oral sentences, which the authors of Word Nerds call 7-Up sentences because they need to have seven words or more. Students can create or find on the Web images to illustrate their word. For an even greater challenge, students can find a single color that represents the word.
This summer I have embarked on a number of curriculum projects, mostly around the Common Core State Standards (CCSS). For Math I wanted to increase the amount of differentiation and technology as well as firmly ground my teaching in the Common Core. The first thing I noticed when I counted up the standards was that there was the same number of standards as full weeks in the school year. That means that my students will have to master one standard a week! At first that thought was quite daunting. My next thought was this is an opportunity to have a very organized curriculum based on a single standard each week. This is how I decided to organize and pace each week:
At the top of each week/page is the unit title, which part of the unit. vocabulary, skills, and the Common Core standard.
Monday will be a whole class, non-differentiated lesson straight from my Math program (Everyday Math). At the end of the Math lesson, I will give a short assessment on the standard of the week. For this part of the weekly plan I didn't reinvent the wheel. Teachers Pay Teachers has several short, one page per standard bundles that are specific to my grade level. I will use these to pre-test my students and put them in differentiated groups for the next three days of the week.
Tuesday, Wednesday, and Thursdays are differentiated instruction days. Students will participate in rotational groups I call "I Love Math" groups. For more information on I Love Math Groups, listen to this podcast or watch this video (the first of 5 parts) on Youtube. Technology will help make differentiation easier. I will use the Ten Marks website on Tuesdays and the Manga High website on Thursday. Both websites allow me to assign lessons/activities and also have fun games and activities for students who finish early. Scoot Pad is a similar website (click the names for links).
Friday we are back to another whole class lesson from Everyday Math. One Friday I will give the post-test (a different "one-pager" from TpT) and this will be graded.
So that's my curriculum pacing guide for next year. I haven't offered this as a product on TpT because it is personal to my situation- a labor of love, if you will. However, if you would like a free digital copy to tweak for you own use, email me at cjones@sau61.org.
Additional EDM/CCSS Alignment Resources:
First, the "official" CCSS alignment from EDM, then the more realistic version from New York.
I have been using The Daily Five and CAFE as my reading workshop structure for the past five years. I read both books very early on and got to meet The Sisters just as they were gaining national attention. I just love these ladies! They have taken me from a good teacher to a great one. Because of them, I have met so many like-minded people who have functioned as my digital mentors. I just hope that I can given back to other teachers out there.
As one of the few pioneers with extensive experience using The Daily Five and CAFE with intermediate level students, I get lots of emails about how to adapt Daily 5 and CAFE. So today I am sharing two adapted CAFE Menus. One is for students transitioning from "learning to read" to "reading to learn". It has less accuracy and fluency standards and more comprehension standards. I use it with fourth graders. The second menu is one I created to use with fifth graders or advanced fourth graders. This menu is completely comprehension. I recently recalibrated both menus to reflect the Common Core standards.
I'd love some feedback on them. Please leave a comment below.
Never fear, the Common Core is here! The internet is fairly exploding with resources for the Common Core State Standards or CCSS. Here are a few of my favorite resources: Number One: A FREEBIE! If you are required to teach from a basal, then you need to check out the Basal Alignment Project on Edmodo. The group is free to join. This dedicated group from New York has taken most of the basal series in grades 3-5 and rewritten the lessons to alignment them with the goals of the Common Core. There are also videos to watch about the shift in expectations, and scaffolded writing assignments that go with the basal text. The best part is that it's free, but joining the group also gives you a chance to expand your personal learning network to include other like-minded teachers. There is also an Anthology Alignment Project (AAP) for grades 6-10 on Edmodo. The "secret" password to join is: pkx4sp Number Two: Teacher-created materials Teachers are already creating materials for the Common Core. Teacher's Pay Teachers is a great site to get some of the best. My favorites are one page sheets that cover a single standard (typically in Math). I have purchased several of these and they are in a binder waiting to be used for review, homework, centers, or to combine several and make a CCSS-alinged unit assessment. Easy peasy! Some of my favorites are:
Number Three: This summers BIG purchase (but SOOO worth it)! For months I have been debating with myself about making this purchase. I totally blew the budget out of the water. Because of this I will (reluctantly) have to have my students buy their own school supplies this year. I hate to do this because of the burden it places on many families in my school that can't afford to do that. But for a long time I have felt like my Writing instruction wasn't up to snuff. In fact, Writing is usually the last subject I plan... because I don't look forward to teaching it. With the changeover to the Common Core, I felt I had an opportunity to really revive my Writing program. After a year of research, which included polling some of my virtual "teacher heroes", I decided to purchase Lucy Calkins' Units of Study. Although expensive (I purchased through the publisher which was the cheapest option) the kit that I got was impressive for the price. There is a book about how to set up a writing workshop, a book about troubleshooting common problems, a book of writing samples from various grade levels, a cd of forms and rubrics, and four entire units. Everything is done for you, down to exactly what to say during your mini-lessons. I can't tell you how excited I am to try this next year. I'm thrilled that everything is all planned out for me.
What are YOUR major finds and purchases to teach the Common Core? Have you created anything you want to share? Leave me a comment below!
Teaching additive volume is certainly the most complex of the Common Core Core Measurement and Data standards. I first approached the task using hands-on activities and partner work. After two class periods of instruction, I wasn't getting the results I had hoped for. Time for Plan "B". I decided to try direct instruction.
I started preparing the way I often do nowadays- by going on You Tube and looking for a video on the subject. Using the term "additive volume", I found the following video:
The description had a link to a site. This is how I found Learn Zillion. Learn Zillion is a FREE site where registered teachers can find short, quality videos that directly correlate with the Common Core standards in Math or ELA for grades 3 through high school. Teachers can use the movies to introduce or reinforce a concept or they can download the slides and create a presentation on their own. Students can rewatch these videos to help with homework using a "quick code" that their teacher gives them.
I knew the class would need lots of examples for in-class practice and homework. My favorite site for creating lots of worksheets on the same subject is Worksheet Works. On this site you can set the parameters for the Math assignment and then the site will generate a worksheet and answer key using random numbers. You can generate as many worksheets as you want on a given topic. I printed five worksheets using only composite shapes:
1 to model using a document camera
2 to create a double-sided guided and independent practice worksheet
1 page for homework
1 sheet cut up to make a matching game
Here's how the two lessons went:
Day 1
Materials:
computer that can run PowerPoint or You Tube videos, document camera, 1 copy of the modeling worksheet and answer key, copies for students of double-sided worksheet and homework, two different colors of highlighters, markers, or colored pencils, calculators (optional)
Activity Flow:
1. Review the formula for volume of rectangular prisms using chant and actions. (15 minutes)
2. Show the Learn Zillion movie or slideshow on volume of composite figures. (15 minutes)
3. Project the modeling worksheet using a document camera. Show the students how to divide the shape and color each one a different color. Then go over how to use the "clues" (numbers on the sides) to determine the length, width, and height of each shape. Add the volumes together for the answer. Approach each shape like a puzzle. Watch for the common errors of not knowing that shapes are sometimes labeled on their parallel sides and that often you must use subtraction to find out the length of a side of only one shape. Use the gradual release of responsibility model as you work. (15 minutes)
4. Pass out the student worksheets, highlighters, markers, or colored pencils. Do the first several examples with the students. Then have the students try some on their own. To boost their confidence, I projected the answer key on the board. It told them the correct answer, but not how to get it. I encouraged students to work on their own, using the answers to check their work. If they got stuck, they could raise their hand. (15 minutes)
5. Tonight's homework: homework worksheet (send home Learn Zillion quick code for help) and bring in an empty cardboard box tomorrow
Day 2
Materials:
same as Day 1 (included extra blank copies of last night's homework), tape and glue, index cards (3 per box), cardboard boxes (teacher should bring extras from home)
Activity Flow:
1. Go over the homework with the students. (5 minutes)
2. Using the homework as a guide, divide the class into two groups. Those that did well on the homework will continue with yesterday's worksheets. Again, you will project the answers to act as support. Those that did not do well on the homework will go over it with you using a fresh copy. Allow them a few minutes to work on the in-class assignment, too. (15-20 minutes, as needed)
3. Cooperative Group Activity: Divide the class into pairs. Have each student pick a cardboard box from the ones that were brought in. Each pair will: 1) Decide on the same unit of measurement for their boxes. 2) Measure and find the volume of their boxes separately and label the measurements by taping the index cards on their box. 3) Add the volumes of their boxes together and tape them together. (About 30 minutes)
Jenn Jones over at Hello Literacy recently wrote about a new book Notice and Note: Strategies for Close Reading by Kylene Beers and Robert E. Probst. If you haven't read it, I highly recommend that you add it to your professional reading. It gives a very clear picture of what close reading of fiction texts should look like in an intermediate/middle/high school setting. I found ideas that I can implement in my classroom immediately.
The book explains six "signposts". These are common literary devices that authors use to get the reader to stop and think. When students see one of these devices, it is time to take notice and jot a few notes. I knew this is just what my struggling readers need. They know how to use reading strategies. They can predict and infer when I ask but, left on their own, they don't use these strategies because they don't know when and where to use these them.
I love the idea of signposts. Poor readers often speed through texts, never slowing down and savoring the moment. They are "plot junkies"- always rushing through text to find out what happens next. By showing them where authors have intentionally put stop signs, yield signs, and Rest Areas, I hope I can improve their overall comprehension.
And so on to today's freebie! I have made graphics of the six signposts to use in my classroom and I want you to have them, too! They are medium size (2-4 per page) for use on anchor charts or with teaching small groups of students. Enjoy!
The Gradual Release of Responsibility Model has been around for quite some time as a model of best practices. I use it on a regular basis with my students. But lately I have been thinking about how I have them be a part of this method. I feel it's important to let students in on the "secrets" that make good teaching and learning. For example, I already let students know when I am doing a formative assessment ("I can't help you with this assignment because right now I need to see what you can do by yourself. This will tell me what and how I need to teach in the future.") and why I am using the results of that formative assessment to guide my instruction. (Today, friends, I am putting you into groups based on your score on that formative assessment you took last week...") .
The new Common Core standards ask us to increase the text complexity in our classrooms. It is not enough just to have complex text for high stakes assessment. Our students need to "wrestle" with highly complex text routinely in their classrooms. We need to model how we attack a text that students have absolutely no background knowledge about. We need to hold them accountable for the strategies we have taught them no matter what type of text they encounter.
I decided the gradual release of responsibility model needed a catchy name and make-over. GRR has become 1-2-3 in my classroom. When I say: "Today you have a 1-2-3 assignment." or "Today's work in class is getting you ready to do a 1-2-3 assignment tomorrow.". For a 1-2-3 assignment, students attack the text in three ways:
1- Activate Thinking (gesture: point to head with pointer finger). At this point in the year my students know all the pre-reading strategies. Instead of choosing one for them, I ask them to choose and share with a buddy. Along with sharing the strategy, they also must share why they picked that particular one. I also have them write this down. It is important for students to remember that they must engage their brains before reading and that engagement can take many forms depending on their purpose as a reader.
2- Read through the entire selection (gesture: point to your eyes with two fingers). Students need to read the assignment all the way through in order to get the "big picture". Reading all the way through includes titles, captions, and headings.
3- Selective Reading (gesture: left hand- hold up three fingers with one hand, "pick" them with the other) Students should answer as many questions as they can. Then they should look at the choices (if questions are multiple choice) and reread the selection selectively just to find the answer to these questions. If you are asking the students to do short answer questions, have them start the answer (even if they don't know it) by turning the question around (also called TTQA). Simply by writing down the words of the question, students will be able to know what key words they will need to focus on during the test.
I've written about posting standards before. This shot shows my Reading and Writing Standards for the first six weeks of the school year. The standards in the purple pocket charts are the specific standards for the current unit. The standards that form a border around the outside are the standards we are working on in every unit all year long. It's not unusual for teachers to post standards. I have them in the back of the room by my desk because I think it is more important to me than my students. I want them most visible to remind me what to teach. I also post standards when I post my students' work. This year, my principal asked if we would post our essential questions for each unit. For those of you who do not know what essential questions are, they are part of a unit template espoused by the book "Understanding By Design". A good essential question is a question that inspires curiosity in our students. It is a question that encourages students to relate what they are learning in school to the larger world. To be honest, I have always found essential questions to be a bit hokey and gimmicky. Most sound quite forced. I have been struggling for the past few weeks trying to think how I could honor my principal's request. I am sharing with my students the book "The Writer's Notebook" by Ralph Flectcher. We are on the chapter he titled "Fierce Wonderings". This chapter encourages students to write about what moves them- questions that don't have easy answers. That's when I realized that essential questions should help students wonder. They should drive them to thinking. That's where our "Wonder Wall" was born.
Here it is in its first incarnation. I added the words "It's Essential" just so the adults who troop through my room know what they are looking at. :) But for my fifth graders, they are wonders. There are four "wonders" here:
Who decides what the "highest law of the land" is? (for a history unit on the Birth of a Nation)
How can I dd more relevant details to my writing (for a Writing unit that includes how to write with a purpose and the English skill of writing with prepositional phrases)
Can an object be part of more than one class or group? (for a Math unit on geometry, specifically standards that relate to classifying polygons)
How are picture book and novel narrative structures different? (for a Reading unit based on the novel "Running Out of Time", our first novel study of the year)
And, yes, I am reading them to my students. Not for every lesson certainly, but when they're becoming too task-oriented (instead of thinking/learning-oriented) I will gently bring them back with the purpose of the task they are doing. When we are reviewing a concept, prior to linking it to the next, I will read the wonder and have them ponder it again. This has worked particularly well with the history wonder, which I purposely designed to need a lot of unpacking: Who is the who? What is the highest law in the land? Who did decide the highest law of the land? What gave them the right? Did they decide correctly?
I was spending my Sunday afternoon on Teacher's Pay Teachers looking for resources to teach comma placement in sentences. I have to admit I dread teaching isolated skills like this. I know I need to because it is part of our standards. My students will be tested on it and their results will determine if I keep my job. But stopping creative writing in order to fill in a bunch of worksheets just seems like a step in the wrong direction. Because of interventions for all students in Reading and Math, we have only had thirty minutes for Writing for the past several years. In that time we have to fit in Spelling and grammar, as well as creative writing. As I was looking through the PowerPoints, task cards, games, and endless worksheets created by my hard-working peers, I couldn't help but remember how much fun my students had writing similes and metaphors to dazzling pictures of beautiful butterflies and weird-looking caterpillars (see previous post.) I kept asking myself: How can I make a skill like commas more meaningful to my students and keep them writing? Then, suddenly, it hit me: teach writing by writing. I quickly dug out my Common Core standards and looked at what comma rules my students are expected to know. Then I thought of ways students could do authentic writing while still practicing what they need for the standards. Surprisingly, I found I could do both at the same time, if I was creative. For example, my students need to know how to use commas to separate nouns in a series (Jeff took an apple, chips, and a sandwich for lunch to work.) I decided to have the students brainstorm a list of potential Halloween costumes, such as a princess, Luke Skywalker, or The Hulk. I used Halloween because it is topical and interesting to the students. Then they had to write a sentence for each costume idea, listing at least three things they would need to complete that costume. For example: To be a princess for Halloween, I would need a tiara, sparkly high heels, and a long pink dress. Need to practice commas to set off a list of adjectives? The Halloween costume idea still works: My princess costume is sparkly, girly, and beautiful. Halloween ideas also work for commas after interjections. I projected a list of fun interjections from http://www.english-grammar-revolution.com/list-of-interjections.html. The kids were raring to go and couldn't wait to share their sentences. I hope my post gets you thinking about how you can ditch the worksheets and get kids to practice those grammar skills by actually writing something memorable.